Remember when “camera ready artwork” meant something? Artwork was an even bigger problem when artwork needed to be “camera ready.” Today, it’s all about “production-ready artwork,” which means it is ready for the supplier’s specific production method. Unfortunately, artwork is still a major headache for distributors and suppliers alike. We’ve come a long way and the problems are easier to fix with a skilled graphic artist than they were 15 years ago, yet there are still a few fundamental misunderstandings that cause problems for the promotional products industry:
- Confusion about vector artwork
- Size of artwork
- DPI Dots Per Inch
Vector art
Images that distort when the the image is magnified is likely not a vector file. (For example, photographs are image files, not vector.)
- Vector file types: EPS, AI and PDF
- High-resolution image file types: PSD, TIF, JPG, PNG
- Low-resolution image file types: BMP, GIF, PNG, JPG, DOC, PUB, PPT
File type alone does not guarantee vector or high quality art. A vector file may include a nonvector image in the file. Similarly, you will notice some files (like JPG, PNG) can be high resolution or low resolution. Generally speaking, JPG’s are not going to generate quality imprints. So if you are sending a JPG file (or any file type that might be low resolution), expect problems and/or extra charges for artwork services.
Artwork DPI
This is the number of dots per inch in the image file. On the web, 72 dpi is the standard resolution, as it looks fine on web pages and loads quickly. But when you print, 300 dpi is the minimum standard and results in a higher quality reproduction. The higher the DPI, the better.

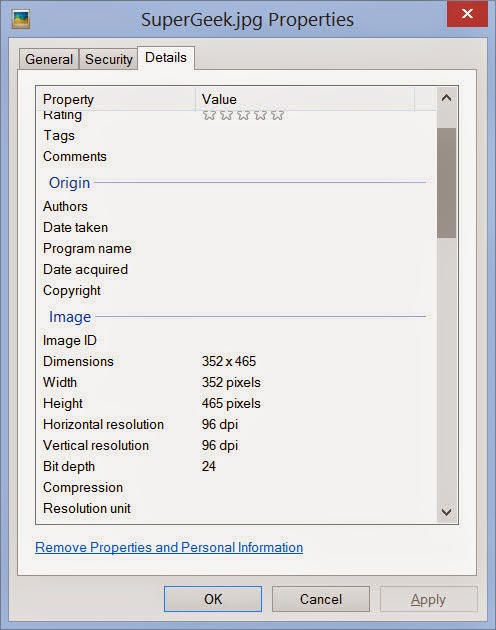
(click image to enlarge)
If you do provide an image file (JPG, PNG), Microsoft Windows users can RIGHT CLICK the file, click properties, and then details to see the resolution of the file. If the file is less than 300DPI, be prepared for charges and/or problems.
Artwork size
- Provide a hard copy PDF. This is particularly important when it comes to artwork with embedded fonts.
- Always carefully review the supplier proof and return the proof quickly.
- Send the artwork with the order, not 24 hours later.
- Read a supplier’s art specs, as most are highly specific. Just because suppliers offer the same imprint “process” does not mean they both have the same “machine” capabilities.
For additional learning, the very talented Tee Hamilton will be presenting a class at the PPAI Expo on artwork. I highly recommend attending.
Dale Denham, MAS+, is the chief information officer at Geiger and is currently running for the PPAI Board of Directors. Learn more about him at www.facebook.com/choosedale. Read Dale’s thoughts on technology, business, and the promotional products world every other Tuesday. Follow Dale on Twitter @GeigerCIO.